I have written a couple of partial posts and have chosen against posting them. Upon re-reading I was feeling that I haven’t added any real content – just subjective opinions on technical things. In the background I’ve been doing a lot of testing.
What have I been testing then:
- Calibration accuracy
- Sensitivity to forces that don’t contribute to actual power generation, referred to as anomalous force rejection.
- Thermal sensitivity
- Quarq Power Meter – To be written up later
More after the break.
Meet the Setups
With all strain gauge measurements the goal is to make a Wheatstone bridge using 4 gauges. If strain in gauge 1 and 3 goes up in resistance and strain gauges at positions 2 and 4 do down in resistance you create a measurable imbalance.
From Omega.ca Click here for PDF
Poisson Bending Side
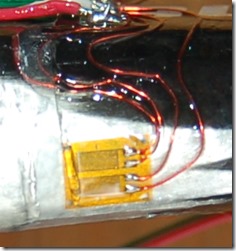
Referring to the the Omega drawings above for Axial strain, these strain gauge rosettes are setup similarly but slightly differently. Essentially I’ve swapped strain gauges 3 and 4. So rather than axial measurement with bending compensation, it’s bending measurement with axial compensation.
The axially measuring top gauge is in tension, therefore the Poisson one is in compression. The bottom axial measurement is therefore compression and causes the Poisson to be tension. All these imbalances create a good differential voltage when under bending.
Poisson Bending Top
Identical in theory to the setup above but the gauges are on the top and bottom of the crank arm not the upper and lower inside. This makes them more sensitive as they are farther away from the neutral bending axis (centre line).
Full Bending Top
Rather than relying on the Poisson ratio for each side of the Wheatstone bridge, each top gauge is wired in series with a corresponding bottom gauge. One pair has reversed excitation. Refer to the diagram above for better understanding. This increases sensitivity further compared to the Poisson setups.
Full Bending Side
Calibration Accuracy
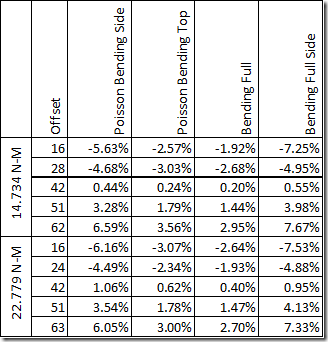
Generally speaking, every setup provides very good accuracy. I’m only going to show selected points below. Take a look at the bottom, it compares the error between the two measurements with different pedal offsets.
Comparing values for each offset (some offsets are different in the second test contributing to higher error) shows the largest error is approximately 1.56%. This meets my 2% criteria easily. This is quite expected. I suspect that companies dropping 2% claimed accuracy down to 1.5% in new iterations of their products is likely due to multi point calibrations, better control and accuracy of calibration weights, etc. rather than major design changes. Though it could be more repeatable strain gauge installations.
Unwanted Force Sensitivity
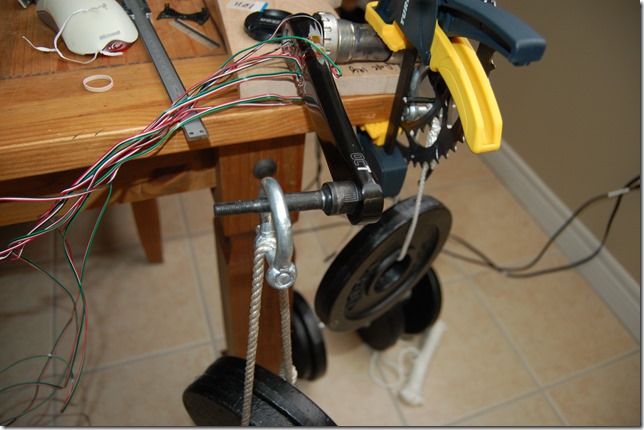
You’ll see a column in the above chart indicating the offset and if you’ve been keen you’ve noticed that the calibration values generally increase with increasing offset. This is how far along an axle the weight is placed. Why does this matter?
<insert picture>
Let us rewind a little to two years ago. One of the great selling points that the original Metri gear (now Garmin Vector) power meter had was the use of Speedplay pedal. The Speedplay can be built up with various different offsets, arm materials, etc. It’s one of the only pedals that I’ve seen that can account for different hip widths. So this offset is important – to a few.
As you push down on a pedal the crank bends about the axis along the crank arm. If you pedal slower, i.e: a pedal masher, you might have bent the old square taper or Octalink 3 piece cranks. You normally would be alerted to your chain ring wobbling as you cycled. It’s the offset from the BB that causes this and the crank arm feels a similar twisting due to the pedal.
So how far away from the crank arm the force is applied will cause shear forces. The problem with these shear forces is that you need to know EXACTLY how the force is applied to ensure your strain gauge is aligned to remove that force. The problem then becomes the pedals used and how a person pedals. A person can cause a torque by twisting their foot. This can show up as false power. This is quite unlikely though from my experience.
So lets look at how much error each offset causes compared to the mean value (Approx 40mm, keep in mind this is the mean of tested, not where I’ll calibrate from in the future for actual pedals).
From my testing I found that I generally do not produce much of an intentional torque on the crank arm by twisting my ankle and my pedal is stiff enough that it doesn’t cause much in the way of deflection. However, it’s clear that some setups are superior to others. I’m using percentage because as seen above some setups are clearly more sensitive than others.(Bending Full is almost three times as sensitive as the Poisson Bending Side for instance). Most would easily allow me +/- 10mm without more than a 2% deviation. This is good, but I’d prefer to stick with the least sensitive to anomalous forces.
Enter V2
Some people may remember my second prototype. It was the first self contained version that could be ridden. It had many issues, but mainly ANT+ transmission strength was the biggest, followed by wires running from one arm to the other through the BB.
I did the exact same test on the V2 old non-OCT Rival Crank and got even better unwanted force rejection characteristics! Not significantly but very good none the less.
Why is this? Two reasons. The Left crank arm of V3 was instrumented further away from the axle. This area has more material and is therefore much stiffer due to the axle. For the Drive side this is near where the spider starts expanding out and increases local stiffness. This drops the shear strain experienced in the area which is what is causing the error. Well, that’s good news for us! The drive side results will be better than the left arm results in theory, but at a worse case it should be equivalent. Essentially it comes down to knowing what kind of pedal a person is using. I’ll be emailing people who have requested beta units for their pedal model numbers shortly – likely this coming weekend.
Thermal Sensitivity
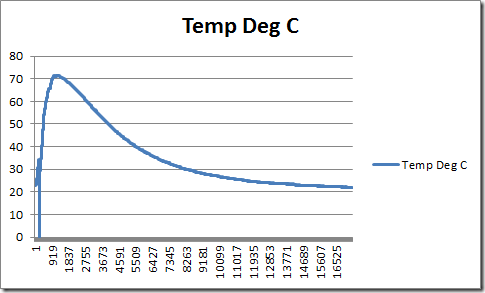
I alluded to this in a previous summary post. Below is a graph of the temperature inside the oven measured via a thermocouple. It has 0.25 degree Celsius accuracy. The thermocouple is taped with a foam tape to the crank arm between the inside full bending arrangement. This provides a temperature point that should be close to average over the whole area.
Even though the tape insulates, it is far from perfect. Mainly because it is only 2-3mm thick. It takes a significant amount of time for the crank arm to heat up. Therefore I am doing most of my calculations once it reaches 55 degrees on the downslope. This should provide ample time for it to heat up and the air to cool to < 55 degree thus making the thermocouple sense primarily the crank itself.
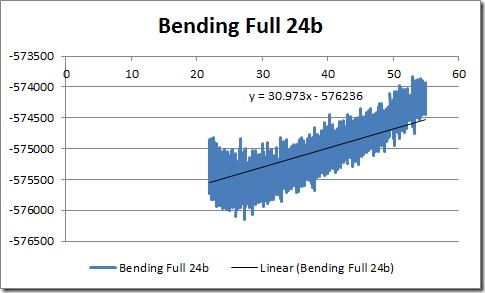
Below are the temperature zero readouts on a 24bit scale.
Bending Full (Double bending bridge on the top and bottom) which provided the greatest anomalous force rejection looks the least linear! This is due to how it’s wired and the isolation from each side making the measurement not 100% correct. This really needs two measurements with both of them acting on the corrections. This is difficult but can be done though I’d rather not.
Notice though that the Inside Bending Full has the greatest sensitivity to temperature. Even though it is linear and in theory should reject thermal expansion. Without compensation this design could cause 5+ watts of offset at 90RPM over a 10 degree temperature shift. Unacceptable!
Notice how well behaved the Poisson Setups are. This is because each half of the Wheatstone Bridge are right next to each other providing the most ideal thermal compensation. It’s interesting to note that the lower sensitivity Poisson Inside setup has greater response. This comes down to manufacturing tolerance being why these are not spot on perfect and responding opposite one another.
While I was at Vishay on training, one of the applications engineers said given the right filtering and measurement tools you can easily measure 1 microstrain. 1 Microstrain is like if you had a 1 km rope and stretched it 1mm. What we are talking about here is 0.001 microstrain. So what I am doing is dealing with a 1km rope being measured by a Vernier Caliper to 0.01mm.
Lets look at the heatup too which will head the thermocouple quicker than the metal below it. This is when the oven heats which is causing an incorrect temperature reading as the air temp is causing the true measure to be much higher initially until the air and the crank come to near equilibrium.
There is some massive lag with the normal double bending configuration. This has to do with a single temperature sensor instead of two (one for each set of gauges). However looking at the Poisson Bending Top shows something different.
This design appears much more linear regardless of how fast or cold it is being heated. So bringing a cold bike out to a warm 30 degree outdoor temp would have an initial error of 1 – 2 watts, this would quickly die down within a few minutes unlike with the double bending bridge arrangement.
I’m closer to the setup that will be used on the beta units now. It’s a hard road to go.









Great post! This is indeed so informative. I find this so impressive as well. This hepls so much in getting a better understanding of how this works. Thanks!
ReplyDelete-RDJacobs.com